First Timer Setting
NOTICE

Always set the time of day before using your oven. If you do not set it, you cannot cook in some oven models.
Set the date
- To change the date setting;
- When the oven is started for the first time, an animation appears on the display and the home screen menu appears.
- Turn the control knob to the right / left to highlight the "Settings" menu.
- Access the setting sub-menu by touching "Settings" on the screen or by pressing the control button 1 time. Scroll through the display and tap the "Date" header between the submenus.
- With "Date (Year)" enabled, set the current year by turning the control knob to the right / left.
- Touch "Date (Year)" on the screen or press the control knob once.
- The "Date (Month)" field is activated on the screen.
- With "Date (Month)" enabled, set the current month by turning the control knob to the right / left.
- Touch "Date (Month)" on the screen or press the control knob once.
- The "Date (Day)" field is activated on the screen.
- With "Date (Day)" enabled, set the current day by turning the control knob to the right / left.


- If you will only set the date, switch to the upper menu by touching the “
 ” button on the screen. Your setting will be confirmed. If you will set the timer, touch the “Time” field or press the control knob once. The "Time (Hour)" field will be activated on the screen and your date settings will be confirmed.
Set the timer
- After setting the date;
- Touch the "Time" field on the screen.
- With "Time (Hour)" field enabled, set the time by turning the control knob to the right / left.
- Touch "Time (Hour)" on the screen or press the control knob once.
- The "Time (Minute)" field is activated on the screen.
- With "Time (Minute)" field enabled, set the minute by turning the control knob to the right / left.


- If you will only set the timer, switch to the upper menu by touching the “” key on the display. Your setting is confirmed and the next submenu setting is activated. If you will continue with other settings, continue the other settings by tapping the relevant setting on the screen.
Set the language
- While in the settings menu; select the "Language" field.
- Turn the control knob to the right / left to select the language you want.
- Touch the “” key on the display to confirm the setting.
- The language setting change requires the watch to be restarted. For this, a warning screen is displayed to restart on the screen.
- Confirm restart.

- The language change is confirmed and the oven timer restarts.
Adjust the water hardness level
You must adjust the water hardness level for your oven during the initial use. The range for the hardness level of the water to be used is indicated in the table below. This is necessary to remove the limescale on the surfaces of the steam generation system at the right time.
Preparation process of the test strip is described below.
A | B | C | D | E | F |
|
|
|
|
|
No limescale |
Very little limescale | |||||
Little limescale | |||||
Limescale | |||||
Too much limescale | |||||
Excessive amount of limescale | |||||
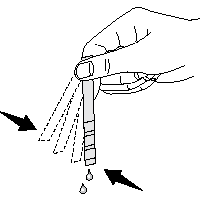
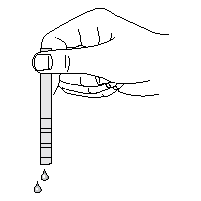
Unpack the test strip. | Let the water tap flow for 1 minute. | Soak the test strip in water for 1 minute. | Take it out of the water and shake it. | Wait for 1 minute. | Adjust the water hardness level of your product based on the result obtained from the test strip. |


Water hardness adjustment table
Hardness level | British water hardness level odE | German water hardness level odH | French water hardness level odF | Level of hardness | Water hardness level to be set for the oven |
|---|---|---|---|---|---|
| 0-5 | 0-4 | 0-8 | Soft water | Low |
| 6-9 | 5-7 | 9-13 | Partially soft water | |
| 10-15 | 8-12 | 14-22 | Partially medium-hard water | Mid |
| 16-19 | 13-15 | 23-27 | Medium-hard water | |
| 20-24 | 16-19 | 28-34 | Partially hard water | High |
| 25-62 | 20-50 | 35-90 | Hard water |
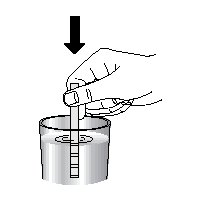
- Do not hold the test strip under running water; perform the measurement in a glass.
- Waiting for longer than 1 minute will lead to incorrect results.
- If the result is hard water, you can also use bottled water. You can repeat the measurement for bottled water if you wish so.
- Select the input value suitable for the number of areas that change colour on the test strip from the table above, and enter the information on the relevant menu screen.
- After the measurement, keep the test strip away from children and dispose it. Empty the water inside the measurement glass.
Set the water hardness level
- After determining the hardness level of your water in the settings menu:
- Touch "Waterhardness" on the screen.
- Turn the oven control knob to right/left to set the determined water hardness level when the "Waterhardness" is activated.
- If you will only set the water hardness level, touch "" on the screen to return to the upper menu. Your setting will be confirmed and next submenu will be activated. If you will continue to make other settings, touch the relevant setting on the screen.